Adding a new Resident to the system will create their Resident Home Page. Only a User assigned the relevant permissions can add a new Resident in Platinum 5.0.
a) To add a new Resident, select the Resident Admin icon on your Home page.
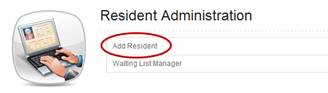
b) Select Add Resident from the Resident Administration menu.
c) ‘Add Resident’ window will display on the screen. This window allows you to enter the Resident’s basic information and will create their Resident Profile within the system. Required fields are indicated with an asterisk.
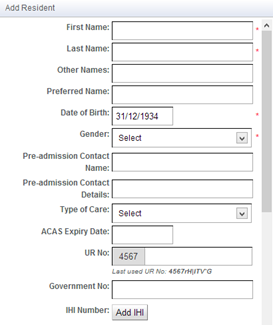
d) Enter the new Resident’s details into the blank fields displayed:
· First Name/Last Name - the Resident’s First & Last name should be entered as you wish it to appear on all records for this Resident within the program.
· Other Names – the Resident’s middle name(s) should be entered here.
· Preferred Name – enter the name by which the Resident prefers to be known.
· Date of Birth - enter the Resident’s date of birth in a dd/mm/yyyy format. Alternatively, you can select a Date of Birth from the interactive calendar displayed when you click into the Date of Birth field. The date defaults to 01/01/1935. select a date from the calendar by navigating to and clicking the required date. This date will be populated into the Date of Birth field.
· Gender – select the Resident’s gender from the dropdown options.
· Pre-admission Contact Name/Contact Details – enter the Resident’s pre-admission contact person & contact details.
· Type of Care – select the required level of care or occupancy for the Resident/client from the dropdown options.
· ACAS Expiry Date – enter the expiry date by clicking into the ACAS Expiry Date field. An interactive calendar will be displayed. select the date from the calendar by clicking the required date and this date will be populated into the ACAS Expiry Date field.
· UR No - this is the Unique Record (UR) number which the organisation selects and uses for each Resident across the organisation. This field should only be completed as relevant. The last used number will be displayed beneath the field for your reference.
· Government No: – enter the Resident’s allocated Commonwealth ID into this field, as applicable.
· IHI Number- Individual Health Identifier: this 16-digit number is used to identify Residents / clients to the MHR System.
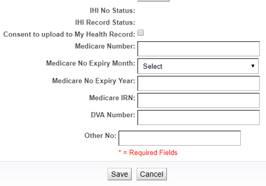
· Consent to upload to My Health Record – In order to have Resident / client information uploaded to My Health Record they or a medical power attorney must provide consent to the facility to share their assessment data.
· Medicare Number – This must be the 10-digit number showed on the Medicare card. This number now links to the MHR and must be accurately recorded to share information with the MHR. The Medicare number will populate into other appropriate forms, however can only be edited from the Resident Settings section after the initial admission process.
· Medicare IRN - The IRN is the number that appears to the left of the patient’s name on their Medicare card.
e) Once all details have been entered, click Save. The new Resident will now be saved in the system and a message will display on the screen.
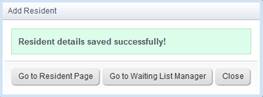
f) You now have the following options:
i. Go to Resident Page – this will take you to the Resident Page
ii. Go to Waiting List Manager – this will take you to the Waiting List Manager, allowing you to place the Resident on a Waiting List.
iii. Close – this will close the window and return you to your Home Page.
Once their initial details are entered, the Resident/Client’s status within the program will be ‘un-admitted’.