Provider organizations are required to provide the following information which is downloadable from the DEX Portal, under Reference Data:
i. DEXReferenceData.xml
ii. OrganisationActivityData.xml
iii. OrganisationData.xml
iv. OutletActivityData.xml
v. DEXFileUpload.xsd
A CareEpisodeUploadTEMPLATE will be filled in based on the information provided above, i.e. item 1a to 1 d.
a. CareEpisodeUploadTEMPLATE
i. ServiceCategoryTab
|
S/No |
Field Name |
Field Type |
Description |
|
1 |
FacilityName |
Text |
This is the name of the facility, which the DEX Reporting is to be generated for |
|
2 |
Code |
Text Or Number |
This is the abbreviation for the Sub-Programme |
|
3 |
Name |
Text |
This is the Sub-Programme for CHSP |
|
4 |
ReportName |
Text |
This is the Outlet Activity ID from the OutletActivityData.xml |
|
5 |
Description |
Text Field |
This is the same as Name, mentioned in S/No. 3 |
ii. ServiceTypeTab
|
S/No |
Field Name |
Field Type |
Description |
|
1 |
CategoryName |
Text |
This is the Sub-Programme for CHSP |
|
2 |
Code |
Text or Number |
This is the abbreviation for the Sub-Programme |
|
3 |
Name |
Text |
This is the Service Type under the Sub-Programme |
|
4 |
ReportName |
Text |
This is the Service Type under the Sub-Programme |
|
5 |
Description |
Text |
This is the Service Type under the Sub-Programme |
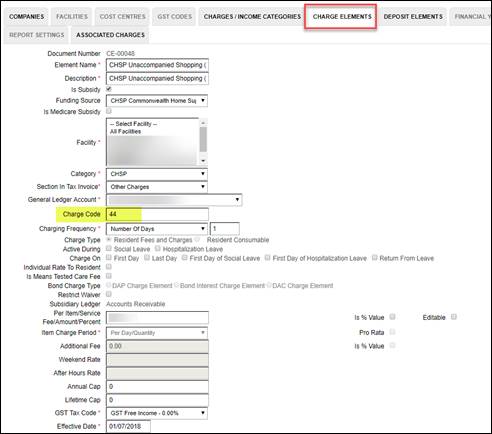
The Service Type IDs as per requirement from DEX for the Service Sub-Types, are to be setup in the Charge Code, under individual Charge Element:

Details
Navigate to Reports > Data Exchange:
![]()
a. In the DATA EXCHANGE tab, you will see the Generate DEX Report button

b. Click on the Generate DEX Report button and you will see the next screen:

§ The Start Date and End Date displays the current date
Reporting Periods and Deadlines
|
Type |
Description |
|
Reporting Period 1 |
Runs from 1 July to 31 December |
|
Reporting Period 2 |
Runs from 1 January to 30 June |
§ For Reporting Period 1, the dates to be entered should be as follows:

§ For Reporting Period 2, the dates to be entered should be as follows:

§ Please note that the year for each Reporting Period should be the relevant year relating to the respective reporting period.
Once the relevant Start and End Date had been entered, click on Generate. To cancel the process, click on Cancel.
Once the DEX XML had been generated, the status of the file upload can be seen in the Remarks column.

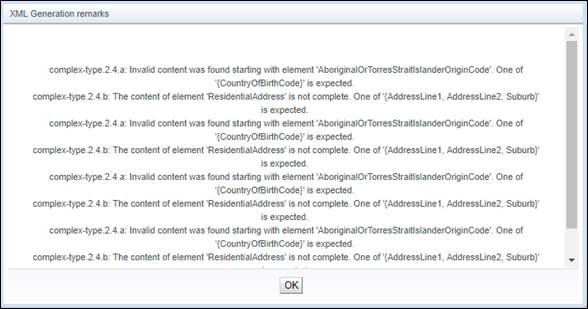
a. Click on View Remarks to see the errors
§ Sample errors as per screenshots below:


§ For DexFileUpload which have errors, they will need to be rectified and file to be generated again.
b. To download the XML, click on Download
§ The downloaded xml file will be available in the Downloads folder in the C:/drive or the location which you selected at the time of downloading e.g. Desktop
User will need to import this downloaded xml into the DEX portal during the respective reporting period, when the DEX portal is open for reporting.