Introduction
A schedule can be set for a List Report to be generated automatically and sent to specified recipients via email.
The system will continue generating and transmitting the report(s) at the interval specified by the user until the automatic generation and transmission schedule is removed.
This is a comprehensively designed feature is of great value to the managers or other staff members requiring certain List Reports at set intervals. Only a correct setup for the report(s) you wish to send out automatically is required and the system will take care of the rest.
Set Up
This feature is required to be turned on at the organizational level.
· Navigate to Tools > Application Settings to turn this feature on
· A new checkbox ‘Auto Report Enabled’ has been introduced
· Tick this checkbox and click ‘Save Settings’ at the bottom of the screen.
![]()
Then:
· Navigate to Tools > Manage Users
· Search for ‘reportuser’ username
(This is a system generated user which facilitates the automatic generation and transmission of List Reports)
· Ensure that this user has:
· A Role with maximum Permissions; e.g. CEO/Administrator/DON in all Facilities
· Access to all residents in all Facilities
Once the above steps are performed, the automatic transmission of List Reports via email feature will be turned on at the organizational level.
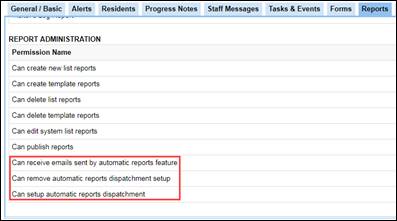
Permissions
The new Permissions pertinent to this feature are as follows:
· Can receive emails sent by automatic reports feature
o This Permissions allows a user to be selected as a recipient of automatic reports
· Can remove automatic reports dispatchment setup
o This Permission enables a user to remove an existing emailing setup
· Can setup automatic reports dispatchment
o This Permission regulates user access to automatic emailing setup
These Permissions can be located in the Reports Administration section of the Report tab in Tools > Manage Roles > Add / Edit:
The above mentioned Permissions are discussed in detail as follows:
Can receive emails sent by automatic reports feature
Tick this Permission in all Roles whose users require to automatically receive reports by email.
If a user does not have a Role with this Permission, they cannot be configured to automatically receive the List Reports by email.
Can remove automatic reports dispatchment setup
Tick this Permission in all Roles whose users should be able to delete an existing automatic emailing setup.
If a user does not have a Role with this Permission (but a Role with the Can setup automatic reports dispatchment Permission explained below), they will be able to access and see the existing automatic emaling setups for List Report(s) but will not be able to delete any.
Can setup automatic reports dispatchment
Tick this Permission in all Roles whose users require the capability to access and set up automatic reports generation and transmission.
If a user has a Role in which this Permission is not ticked, they will not be able to access the automatic emailing setup screen ‘Email Reports Management’ (schedule and filter selection) in P5.
Create Automatic Emailing Set Up
The next step after setting up the Permissions in relevant Roles is to set up the generation and transmission schedule along with desired report filters at the List Report level.
To do so, navigate to List Reports.
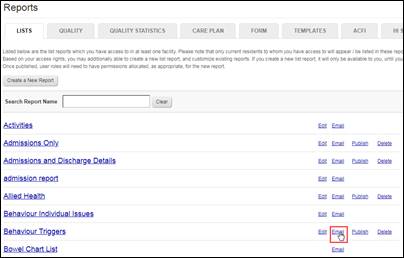
Click the ‘Email’ link provided to the right of the Report you wish to setup automatic emails for.
The ‘Email Reports Management’ screen will load:
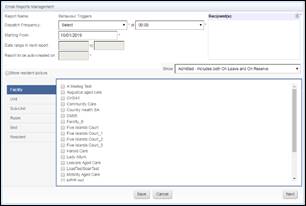
The name of the report the screen shows the automatic emailing setup is shown for is displayed against ‘Report Name’ field. It cannot be changed.
Specify how often the report should be generated and dispatched via email by selecting an appropriate value from ‘Dispatch Frequency’ dropdown.
![]()
The options which appear in ‘Dispatch Frequency’ dropdown are discussed as follows:
Daily: When this option is selected, a time value will need to be selected from the time dropdown which is another new dropdown and appears to the right of the dispatch frequency dropdown.
When the Daily option is selected, the system will generate the report appearing in the Report Name field every day at the time selected in the time dropdown.
Weekly: When this option is selected, a time value will need to be selected from the time dropdown which is another new dropdown and appears to the right of the Dispatch Frequency dropdown.
When the Weekly option is selected, the system will generate the report appearing in the Report Name field on the day of the week specified by the Starting From date (discussed separately), at the time selected in the time dropdown.
Fortnightly: When this option is selected, a time value will need to be selected from the time dropdown which is another new dropdown and appears to the right of the Dispatch Frequency dropdown.
When the Fortnightly option is selected, the system will generate the report appearing in the Report Name field on the day of the fortnight specified by the Starting From date (discussed separately), at the time selected in the time dropdown.
Monthly: When this option is selected, a time value will need to be selected from the time dropdown which is another new dropdown and appears to the right of the Dispatch Frequency dropdown.
When the Monthly option is selected, the system will generate the report appearing in the Report Name field on the date of the month specified by the Starting From date (discussed separately), at the time selected in the time dropdown; e-g on 15th of each month at 1:00 am server time.
Every 3 Months: When this option is selected, a time value will need to be selected from the time dropdown which is another new dropdown and appears to the right of the Dispatch Frequency dropdown.
When the Every 3 Months option is selected, every three months the system will generate the report appearing in the Report Name field on the day (in three months) specified by the Starting From date (discussed separately), at the time selected in the time dropdown; e-g on Tuesday at 1:00 am server time, every three months from the Starting From date.
‘Starting Date’ Selection
The field after the Dispatch Frequency field is the Starting From date
![]()
Enter the date from which you require the report to be sent automatically.
Note that this date cannot be a past date.
The system will send the report on daily, weekly, fortnightly or every three months (as specificed in Dispatch Frequency dropdown) from the date entered in this field.
‘Date Range in next report’ & ‘Report to be auto-created on’ fields
The next two fields, ‘Date range in next report’ and ‘Report to be auto-created on’ fields are read only.
The purpose of the Date range in next report field is to display the date range which the system will use when it automatically generates and sends the report.
‘Report to be auto-created on’ field specifies the date when the report will next be generated and sent automatically.

Recipient Selection
The next step is to select the recipients of the automatically generated report. This can be done using ‘Recipients’ field:
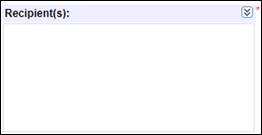
Click the below highlighted button from the Recipients field:
![]()
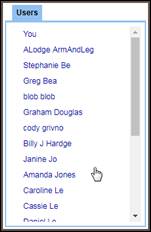
This will load the list of users which can be selected as recipients of the report:
Note that only those users will appear in this list who have a Role with the ‘Can receive emails sent by automatic reports feature’ Permission.
Click the desired users’ names to select them as recipients.
The selected users will start appearing in the Recipients fields, as shown below
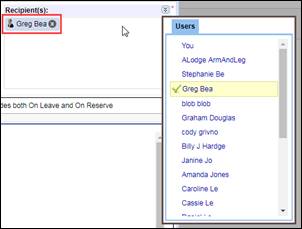
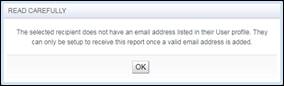
Note: As the report is to be sent via email, each recipient must have an email address saved in their user profile (Tools > Manage Users).
If a recipient does not have an email address saved in thir user profile, the system will show the below error message:
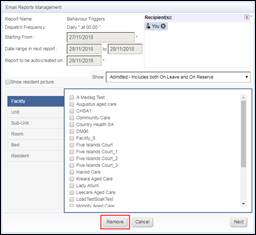
Selecting Report Filters
In order to define the report filters, refer to the bottom half of the Email Reports Management screen. The filters of the report currently displayed in the Report Name field will be shown on the Email Reports Management screen; e.g.

The method of selecting report filters on this screen is the same as doing so before running the report shown in the Report Name field.
The only difference is that the date range does not need to be selected as the system automatically determines that information using the information entered/selected in the below fields:
· Starting From
· Dispatch Frequency
The system then shows the date range in ‘Date range in next report’ field and date the system will automatically generate the report on in ‘Report to be auto-created on’ fields, as discussed above.
Saving the Automatic Emailing Setup
The automatic setup for generation and transmission of the report can be saved by clicking the ‘Save’ button.
When ‘Save’ is pressed, the system will display the below message in the form of a dialog box:
![]()
The content of the message in the dialog box is as follows:
Please ensure that all recipients selected currently have sufficient Permissions to access the information contained in the report which the system will generate and send.
There are two options in the dialog box shown above:
Confirm
Click ‘Confirm’ if you acknowledge that you have configured the automatic emailing setup correctly.
Clicking ‘Confirm’ will save the automatic emailing setup you configured.
Back
Click ‘Back’ if you wish to review the setup you pressed ‘Save’ button on.
Automatic Emailing Setups for Remaining Reports
Repeat the above steps for all reports which need to be generated and emailed automatically.
Removing an Existing Automatic Emailing Setup
To remove an existing automatic emailing setup, navigate to the desired List Report (for which an automatic emailing setup already exists) and click ‘Email’. The Email Reports Management screen will load.
Permission to Remove an Existing Automatic Emailing Setup
If the currently logged in user has a Role in which the ‘Can remove automatic reports dispatchment setup’ Permission is ticked, a ‘Remove’ button will be visible at the bottom of the screen:
Click ‘Remove’.
Another warning message in the form of a dialog box will be displayed when the ‘Remove’ button is clicked.
The content of the message is below:
This will remove any automatic report emailing setup for this report. Do you wish to proceed?
The dialog box is shown in the following screen:
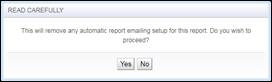
There are two options in the dialog box shown above, discussed as follows:
Yes
Click ‘Yes’ if you would like to proceed with deletion of the automatic emailing setup for the report displayed in the Report Name field of the Email Reports Management screen.
No
Click ‘No’ if you do not wish to proceed with deletion.
List of Existing Automatic Emailing Setup
To view the automatic emailing setups which are currently saved in the system, navigate to ‘Email’ tab of Reports module.
On this screen, a grid is shown which displays the details of the currently saved automatic emailing setups for reports:

The grid in this tab will be blank if currently there are no automatic emailing setup saved:

Notes
· An automatic emailing setup cannot be edited
To make changes to an existing emailing setup, please remove it by following the steps provided above (navigate to the desired List Report and click ‘Email’. The Email Reports Management screen will load. If the currently logged in user has a Role in which the ‘Can remove automatic reports dispatchment setup’ Permission is ticked, ‘Remove’ button will be visible’, click ‘Remove’)
Once the setup has been removed, create a new one for the same report and incorporate your desired changes
· Only one emailing setup can be saved per report per organisation
· Emailing setups exist at Organisation level, hence they are not Facility specific